このセクションでは、Skypeアプリケーションを使用して添付ファイルとテンプレートメッセージを渡すために使用される、電子メール、Skype コンタクト、コンタクト 名を取得するフォームの作成方法について説明します。
OpenRPAフォーム
ここでは、ユーザーがクライアントから上記の値を収集するための動的なWPFフォームを作成します。
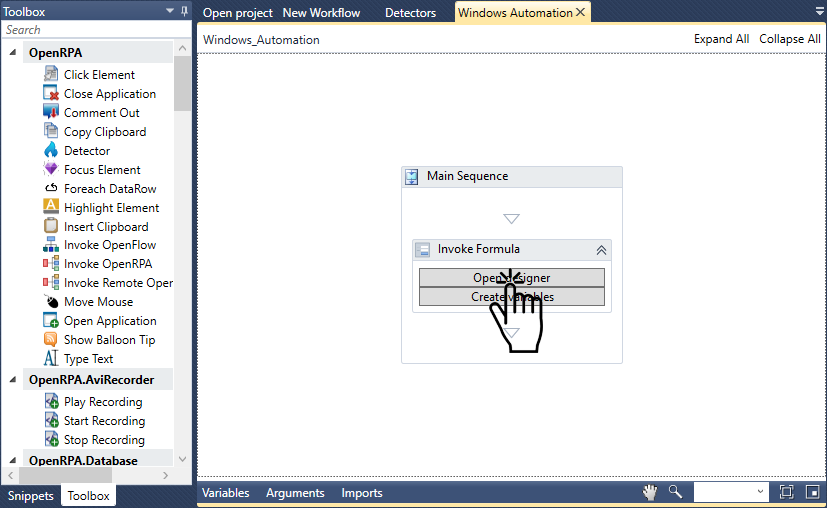
まず、Invoke Formulaスニペットをメインシーケンスにドラッグします。
ここで、「 デザイナーを開く」をクリックして、フォーム デザイナーを開きます。

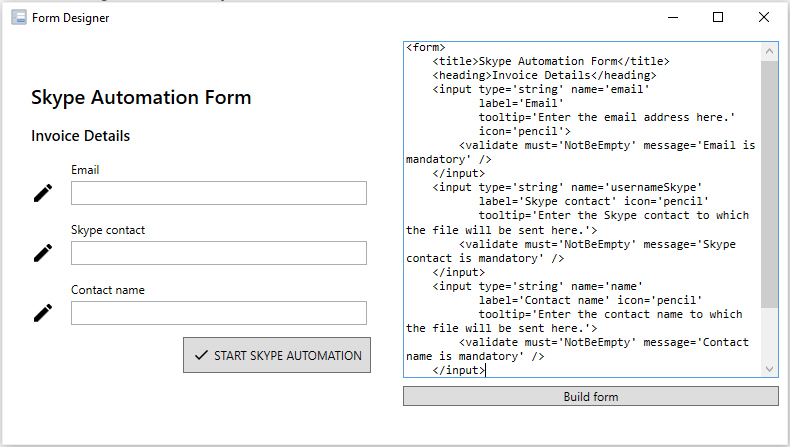
サンプルコードをすべて消去し、以下のコードスニペットをデザイナーのコードエディタに追加します。
<form> <title>Skype Automation Form</title> <heading>Invoice Details</heading> <input type='string' name='email' label='Email' tooltip='Enter the email address here.' icon='pencil'> <validate must='NotBeEmpty' message='Email is mandatory' /> </input> <input type='string' name='usernameSkype' label='Skype contact' icon='pencil' tooltip='Enter the Skype contact to which the file will be sent here.'> <validate must='NotBeEmpty' message='Skype contact is mandatory' /> </input> <input type='string' name='name' label='Contact name' icon='pencil' tooltip='Enter the contact name to which the file will be sent here.'> <validate must='NotBeEmpty' message='Contact name is mandatory' /> </input> <action name='submit' content='START SKYPE AUTOMATION' icon='check' validates='true' ClosesDialog='true' /></form>

もしあなたがHTMLやその他のマークアップ言語に慣れているなら、この舞台裏で何が起こっているのか理解できるかもしれません。そうでない場合は、OpenRPA Formsのセクションを参照してください。
フォーム作成ボタンを押すと、フォーム デザイナーの左側パネルにWPFフォームが作成され、プレビューを見ることができます。
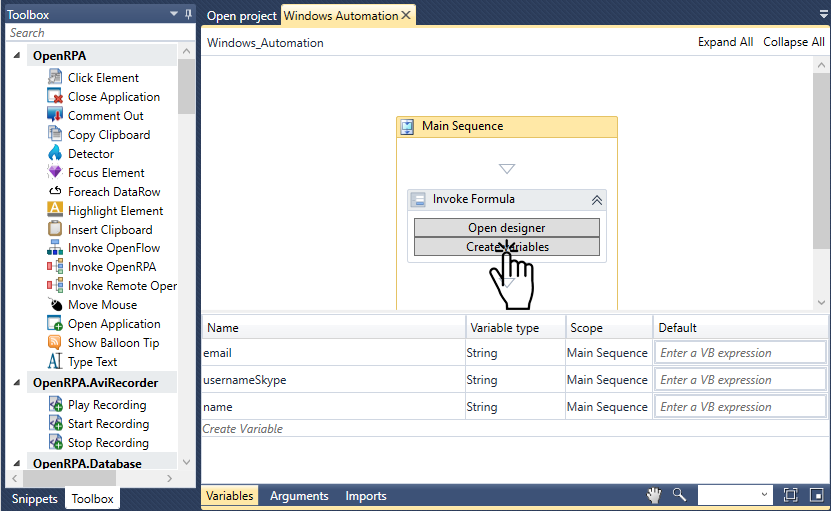
その後、ユーザーは変数作成ボタンを押すことで、フォーム デザイナーの内部で定義されたすべての変数が自動的に作成されます。簡単でしょう?

備考
OpenRPA Formsの使用を避けたい場合は、Assignアクティビティを使用して変数email、usernameSkype、nameに値を割り当てるだけで、その値を使用して目的のクライアントに添付ファイルとテンプレートメッセージを送信することができます。
備考
フォーム デザイナーは、クライアントからの入力を収集するために、ユーザーが希望するWPFフォームを作成する場所です。その右側には、入力フォームのプレビューが表示される。その左側には、入力フォームを設計するために使用するコードを入力します。フォーム デザイナーにコードを追加した後、常にビルドフォームボタンを押して変更を保存し、プレビューを可視化することができます。
